Google App Engine (GAE), which is known for its scalability and performance, was criticised for not supporting PHP since its first day of existence. Though the enthusiasts came out with different solutions like Quercus/Java out of their love for the language, they were always waiting for the official support. And here it is. Google, unable to ignore the Majority Web Developers' long standing demand for PHP runtime on their platform has finally announced official support for PHP earlier in this year. Gone is forever gone. Let us now forget the history and together relish the PHP experience on GAE. I mean: scroll down further and read the tutorial.

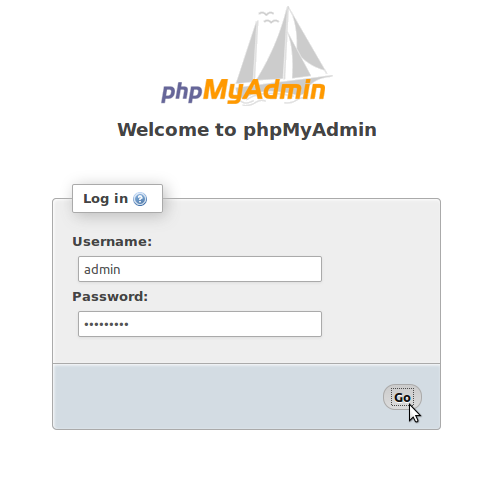
 You will now be presented with phpMyAdmin login screen. Enter admin in the Username field, enter the password you have set and click "Go".
 You should feel secure about the fact that your phpMyadmin is protected by two layers of password. If all went well, you should now be logged into phpMyAdmin. The superabundant features that phpMyAdmin offers are all yours now. But wait, configuration is not finished yet. phpMyAdmin is yet not able to offer its feature called Configuration Storage. For phpMyAdmin to deliver these features to you, it needs a database with a few tables and a control user with all privileges on that database. Let's give it now:
Take care...
Prerequisites:
Before starting this tutorial, I assume the following:- that you know the nitty-gritty of PHP and MySQL.
- that you have at least gone through the official documentation of GAE (PHP).
- that you have signed up for Google App Engine and Cloud SQL.
- that you have created your Google Cloud Project. For the rest of this tutorial, the Project ID you chose while creating your project, will be called app-id.
- that in your project, you have created a CloudSQL instance with access to app-id. For the rest of this tutorial, the Instance ID you chose while creating your project, will be called instance-id.
- that your application is whitelisted for PHP deployment. If not, submit your app for whitelisting now. While it is whitelisted, you can follow the Part I of this tutorial.
- that on your system, you have installed:
- PHP 5.4 and know the absolute path to php-cgi executable file.
- Python 2.7
- MySQL server and know how to start/stop it.
- GAE PHP Development kit. The path where you have installed this will be known as sdk_path for the rest of this tutorial.

Part I (Local Installation)
Download phpMyAdmin
PHP/MySQL developers have various reasons to start developing only after installing this masterpiece which combines PHP, MySQL and the richness of GUI. So, without wasting more time, download this piece of treasure now.Create your project directory and stuff it with phpMyAdmin
Create a folder in which we're going to place all our code. We'll call this path project_path for the rest of this tutorial. Extract the downloaded archive to the folder project_path/phpmyadmin.Complete App Engine formalities
Before starting the local GAE server, we must transform our project into a GAE project. If you've gone through the official docs, you must have realised that a project is not a GAE-PHP project unless it contains files named:- app.yaml
- php.ini
app.yaml
Create a file app.yaml in project_path and fill it with the code below:
application:app-idversion: pma runtime: php api_version: 1 handlers: - url: /(.+\.php) script: phpmyadmin/\1 secure: always login: admin - url: /(.+\.php)\?.+$ script: phpmyadmin/\1 secure: always login: admin - url: / script: phpmyadmin/index.php secure: always login: admin - url: /(.*\.(htm$|html$|css$|js$|ico$|jpg$|png$|gif$)) static_files: phpmyadmin/\1 upload: phpmyadmin/(.*\.(htm$|html$|css$|js$|ico$|jpg$|png$|gif$)) secure: always application_readable: true login: adminphp.ini
If you had gone through the official docs, you would have done this already. If not, then do it now. Create a file php.ini inproject_path and fill it with the code below:
google_app_engine.enable_functions = "php_sapi_name, gc_enabled"
Start the servers
There must be two servers running in our setup- Local GAE server (dev_appserver.py)
- MySQL (mysqld)
Starting local GAE server
The official docs already make a mention about this, but let me innovate it a little. In project_path, create a shell scriptstart.sh if you are on linux and fill it with the code below
and run the below command on terminal to make it executablesdk_path/dev_appserver.py . --php_executable_path=path_to_php_cgi/php-cgi
Or if you are on Windows, create a DOS batch file start.bat in project_path and place the following command in it.$ chmod 755project_path/start.sh
Double-click the file to start the server. From now on, instead of typing the whole command, you just have to do this to start the server. If the server starts successfully, the terminal/console window will show something similar to:sdk_path/dev_appserver.py . --php_executable_path=path_to_php_cgi/php-cgi.exe
INFO     2013-07-08 17:38:05,215 api_server.py:153] Starting API server at: http://localhost:37260
INFO     2013-07-08 17:38:05,243 dispatcher.py:164] Starting server "default" running at: http://localhost:8080
INFO     2013-07-08 17:38:05,251 admin_server.py:117] Starting admin server at: http://localhost:8000
Starting MySQL server
Since I assume that you know how to start/stop MySQL server, I leave this to you. But if you still need help, the MySQL documentation is always at your rescue.
Create a MySQL SuperAdmin
You need a username and password to log into your phpMyAdmin installation, don't you? Then let us create a MySQL user with all possible privileges. Open MySQL prompt as root on the command line:mysql -u root -pCREATE USER 'admin'@'%' IDENTIFIED BY '<password>';
GRANT ALL PRIVILEGES ON * . * TO 'admin'@'%' IDENTIFIED BY '<password>' WITH GRANT OPTION MAX_QUERIES_PER_HOUR 0 MAX_CONNECTIONS_PER_HOUR 0 MAX_UPDATES_PER_HOUR 0 MAX_USER_CONNECTIONS 0 ;When there is already a user called root that has all the needed privileges, why do we need admin user?
There are a few reasons for this:
But there's no reason to worry. phpMyAdmin doesn't accept logins with blank passwords unless you ask it to (see here).
- Some MySQL installations have
rootuser with blank password. I'll not recommend you to use phpMyAdmin with a blank password though you can always configure it in that manner.- If you go through this page of Cloud SQL official docs, you'll find that if you add a password to the
rootMySQL user, the APIs Console Interface will lose some functionality, including import and export capabilities, and the SQL prompt. Although this is significant only when we deploy our application to GAE, still let us play safe and be in sync with them.
Finish Configuration of phpMyAdmin
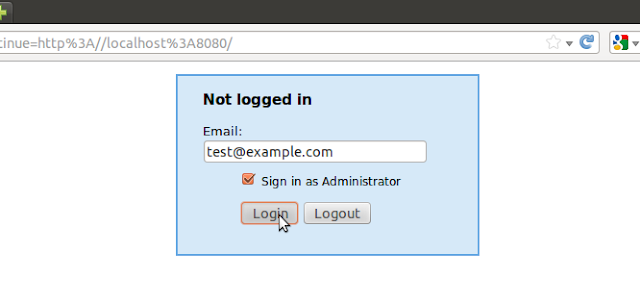
phpMyAdmin is almost installed on your localhost. Start your browser and navigate to http://localhost:8080/. You will be presented with a login screen. Enter an arbitrary email, check "Sign in as Administrator" and click Login.

- Create control user: In phpMyAdmin, navigate to Users >> Add User. Create a user phpmyadmin with a password <control_password> and no global privileges with "Create database with same name and grant all privileges" checked (ticked).
- Create storage database and tables: In project_path/examples, there is a file called create_tables.sql. Open it, copy all content to phpMyAdmin's SQLutility at Databases >> phpmyadmin >> SQL and execute them.
- Update this configuration in phpMyAdmin: In project_path, create a file config.inc.php, and place in it the following code:
<?php $cfg['blowfish_secret'] = 'Place a random pass phrase here. This pass phrase is used for cookie authentication.'; $cfg['QueryHistoryDB'] = true; $cfg['DefaultLang'] = 'en'; $cfg['ServerDefault'] = 0;/* Servers configuration */$i = 0; /* Server: localhost [1] */ $i++; $cfg['Servers'][$i]['AllowNoPassword'] = false; $cfg['Servers'][$i]['verbose'] = 'localhost'; $cfg['Servers'][$i]['host'] = 'localhost'; $cfg['Servers'][$i]['port'] = ''; $cfg['Servers'][$i]['socket'] = ''; $cfg['Servers'][$i]['connect_type'] = 'tcp'; $cfg['Servers'][$i]['extension'] = 'mysqli'; $cfg['Servers'][$i]['auth_type'] = 'cookie'; $cfg['Servers'][$i]['pmadb'] = 'phpmyadmin'; $cfg['Servers'][$i]['controluser'] = 'phpmyadmin'; $cfg['Servers'][$i]['controlpass'] = '<control_passsword>'; $cfg['Servers'][$i]['bookmarktable'] = 'pma__bookmark'; $cfg['Servers'][$i]['relation'] = 'pma__relation'; $cfg['Servers'][$i]['userconfig'] = 'pma__userconfig'; $cfg['Servers'][$i]['table_info'] = 'pma__table_info'; $cfg['Servers'][$i]['column_info'] = 'pma__column_info'; $cfg['Servers'][$i]['history'] = 'pma__history'; $cfg['Servers'][$i]['recent'] = 'pma__recent'; $cfg['Servers'][$i]['table_uiprefs'] = 'pma__table_uiprefs'; $cfg['Servers'][$i]['tracking'] = 'pma__tracking'; $cfg['Servers'][$i]['table_coords'] = 'pma__table_coords'; $cfg['Servers'][$i]['pdf_pages'] = 'pma__pdf_pages'; $cfg['Servers'][$i]['designer_coords'] = 'pma__designer_coords'; /* End of servers configuration */?>
You're done
With this, you've succcessfully installed phpMyAdmin on GAE local installation. I'll conclude the Part I of this tutorial here. Part II will deal with deploying phpMyAdmin on http://pma.app-id.appspot.com. Any comments/suggestions will be highly gratifying.Take care...


Thanks, this was very clear and it worked for me!
ReplyDeleteI have tried everything, but always get "Access denied for user 'root'@'localhost' (using password: NO)"
ReplyDeleteWhen I try this
CREATE USER 'admin'@'%' IDENTIFIED BY '';
GRANT ALL PRIVILEGES ON * . * TO 'admin'@'%' IDENTIFIED BY '' WITH GRANT OPTION MAX_QUERIES_PER_HOUR 0 MAX_CONNECTIONS_PER_HOUR 0 MAX_UPDATES_PER_HOUR 0 MAX_USER_CONNECTIONS 0 ;
Fredrik, were you able to solve this?
Deletesame issue with me ,............Access denied for user 'root'@'localhost' (using password: NO)"
ReplyDeleteWere you able to reach the phpmyadmin login screen? If yes, what username and password did you enter? was it not 'admin' and '<password>' ?
Delete